My Challah-Babka hybrid

The babka of my dreams lives in one of my favourite New York neighbourhoods, and is made by Russ & Daughters, where it makes for the most indulgent breakfast or coffee accompaniment. If you’re lucky to live in the US, you can order online from them, they have the most delicious lox and so many other deli specialties I am addicted to. If not, you can do like me and bake your own homemade version.

Not quite as sweet as a cake but definitely leaning towards dessert, babka is a sweet buttery yeast bread, usually with swirls of chocolate or cinnamon running through. Those swirls pull apart into the most irresistible layers, so rolling and braiding your babka is quite key. Also, like all enriched doughs, making babka is time-consuming, mostly inactive time, waiting for the dough to rise, but patience is a big thing here. Good news, we all have a little extra time these days.

Disclaimer: my recipe is not a real babka one, because it has no eggs (hence it doesn’t raise as much), less butter and less sugar than the original recipe. My dough is almost that of a challah, although it does have milk and butter, so I call this is a hybrid… I do this for two reasons: the original babka recipe creates a dough that is very soft and I find it difficult to roll and braid, and my version is a little “healthier” (in the sweet bread category, this is not spinach soup clearly), so you can have some every fortnight without fearing a heart attack.

I always start by activating the instant yeast, by mixing it with the milk at room temperature and the sugar. I then add the flour, salt and butter and make a dough. If you like a little vanilla in your dough this is the time to add it; I find orange blossom doesn’t work well with chocolate (it does work in plain challah though… oh so well…) but orange zest does. If you have a stand mixer with a dough attachment or a Thermomix, it’s easier, otherwise using a hand whisk and your hands is also fine.

Now you wait. Your dough needs to rest at least an hour; I usually leave it in a bowl covered with a slightly wet cloth, in a dark and warm place. If you’re making your babka ahead, you can also put the bowl in the fridge and bring it out the next morning when you’re ready to work it. This recipe will make one large babka, or two smaller ones (just divide the dough after the first proof and repeat each step twice… maybe trying different flavours).

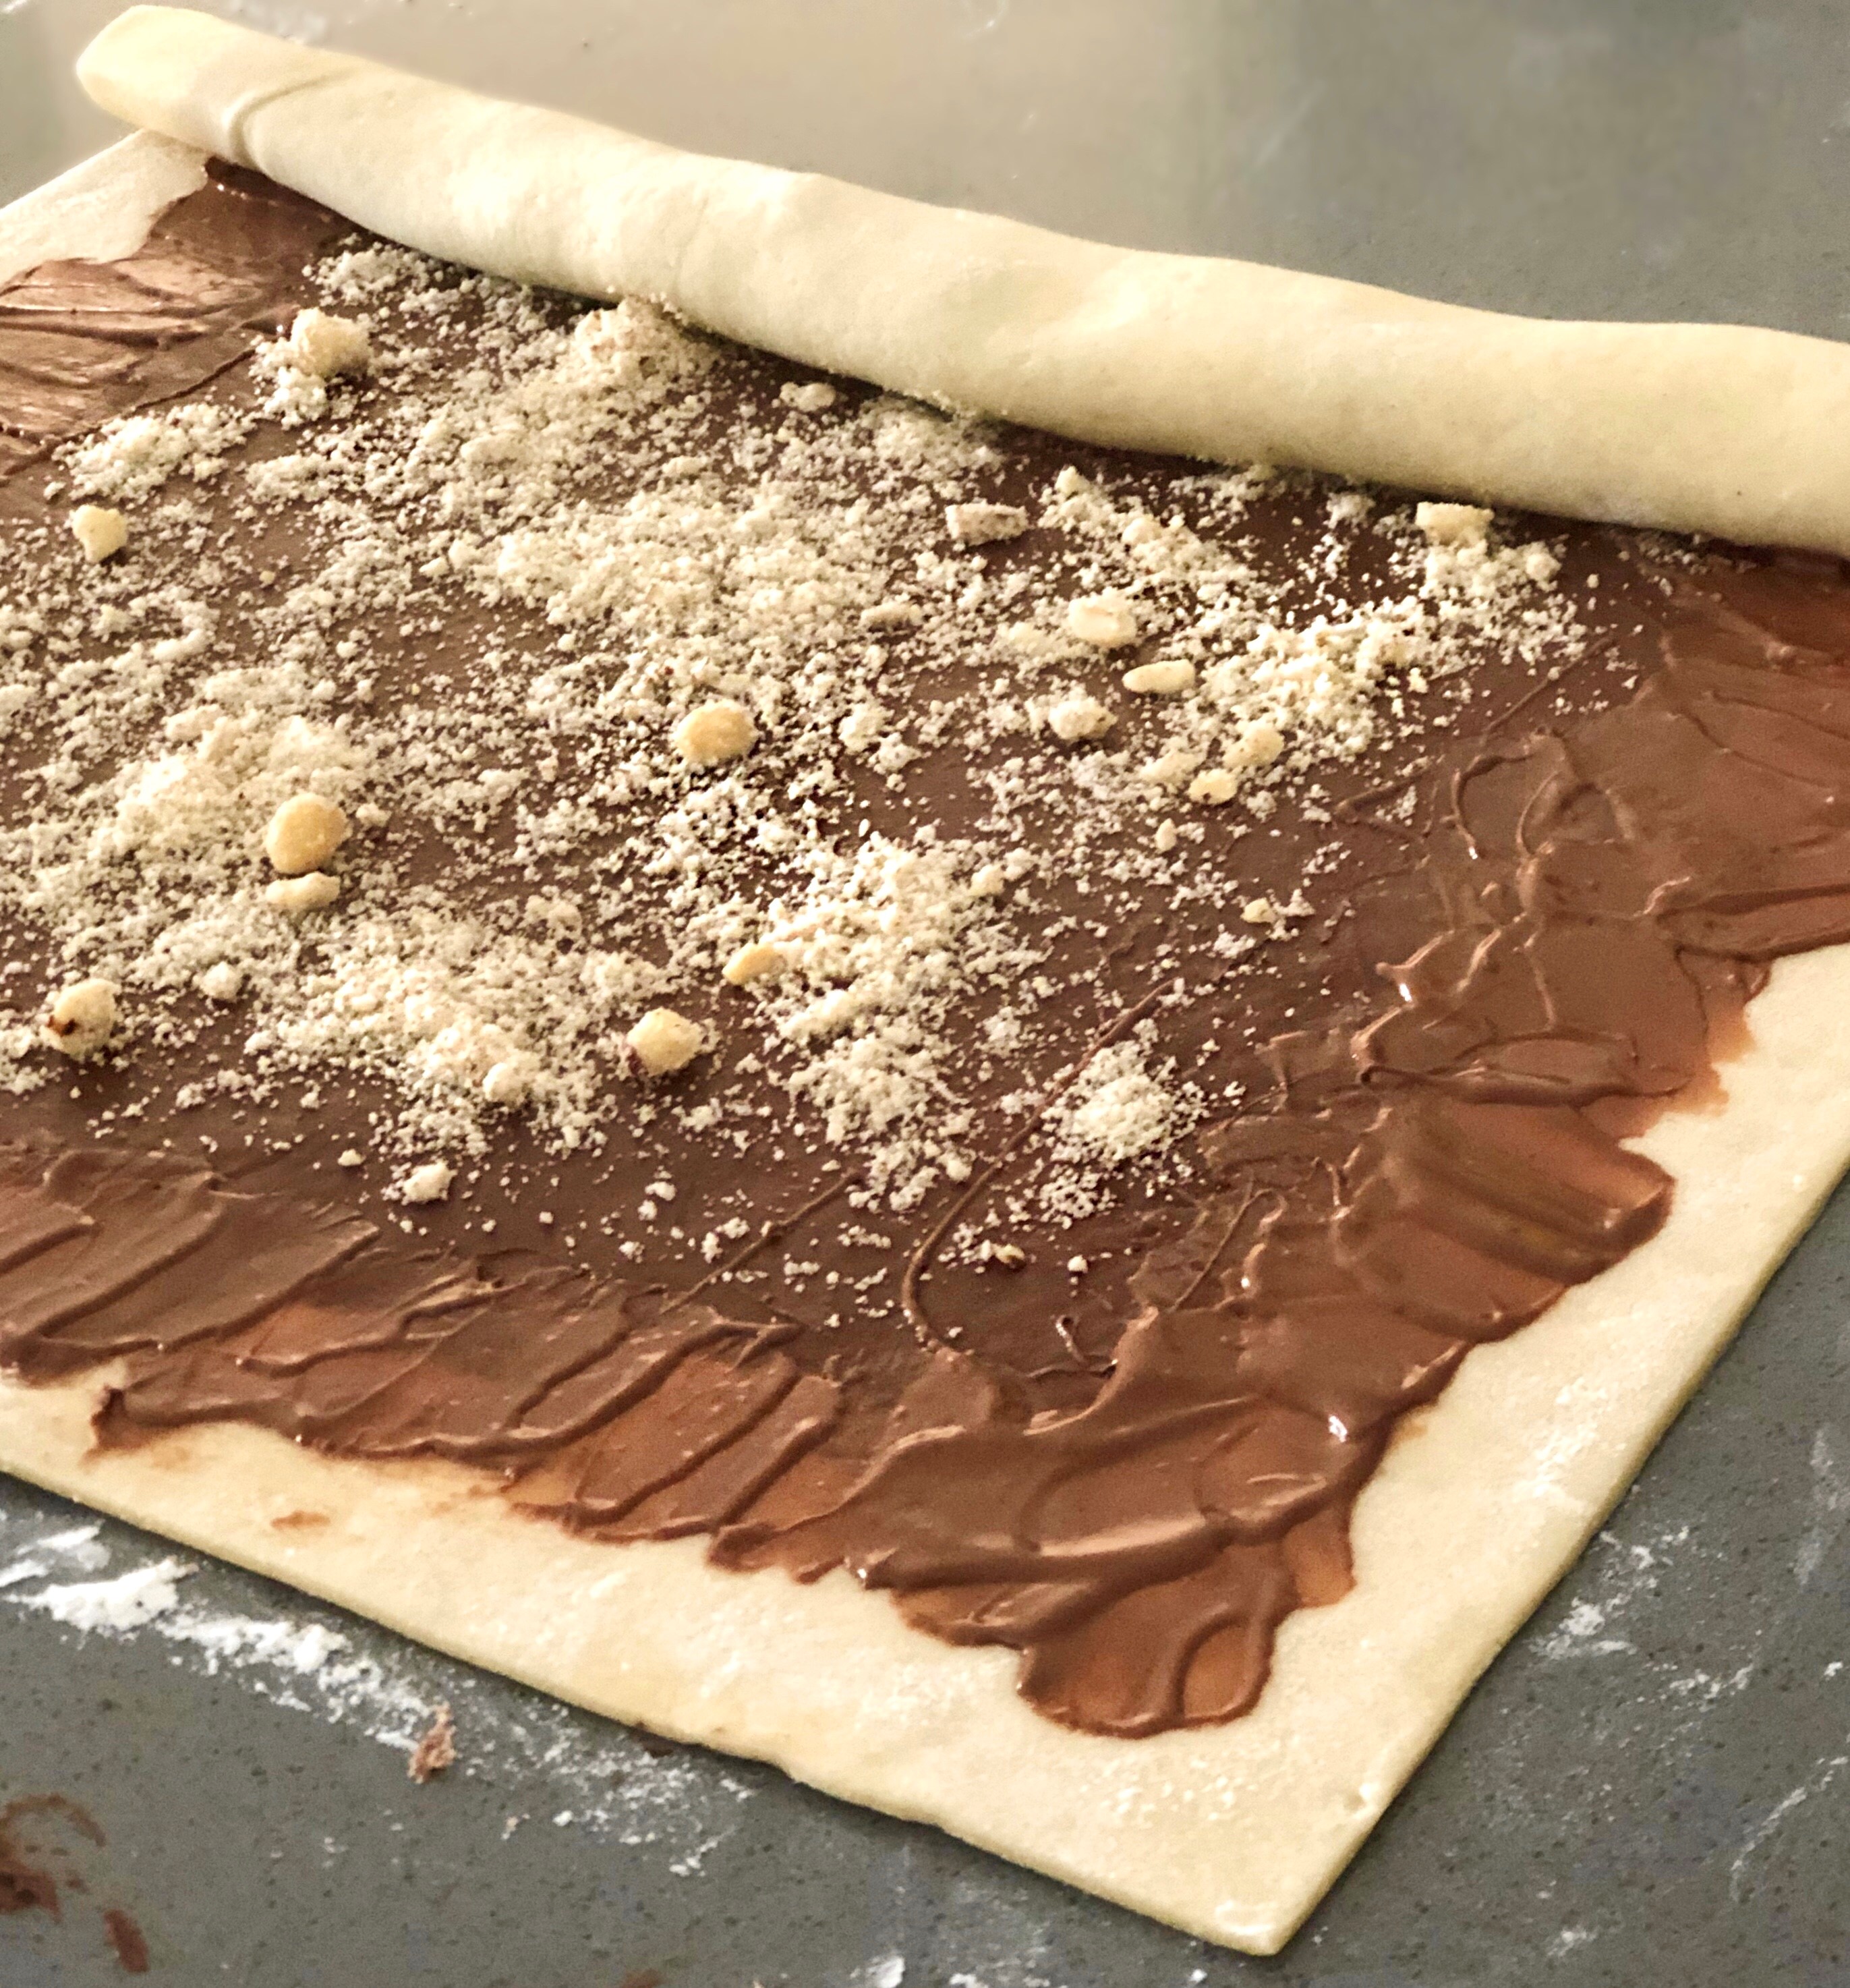
Roll out the dough onto a floured surface, making a rough rectangle, then spread the chocolate paste (we all know which one tastes amazing on this… don’t make me spell it, it’s the one that’s really loaded with palm oil, I haven’t been able to find good enough alternatives in South Africa but in London I used to get some really delicious palm oil free ones from Whole Foods, oh well, sorry…) to the edges of your sheet, and sprinkle with the nuts, and for extra deliciousness you can add some chocolate chunks in the middle, but remember the more stuff you add the harder rolling this baby will be. If you’re making a cinnamon babka then you make a spreadable paste with butter, sugar and cinnamon.

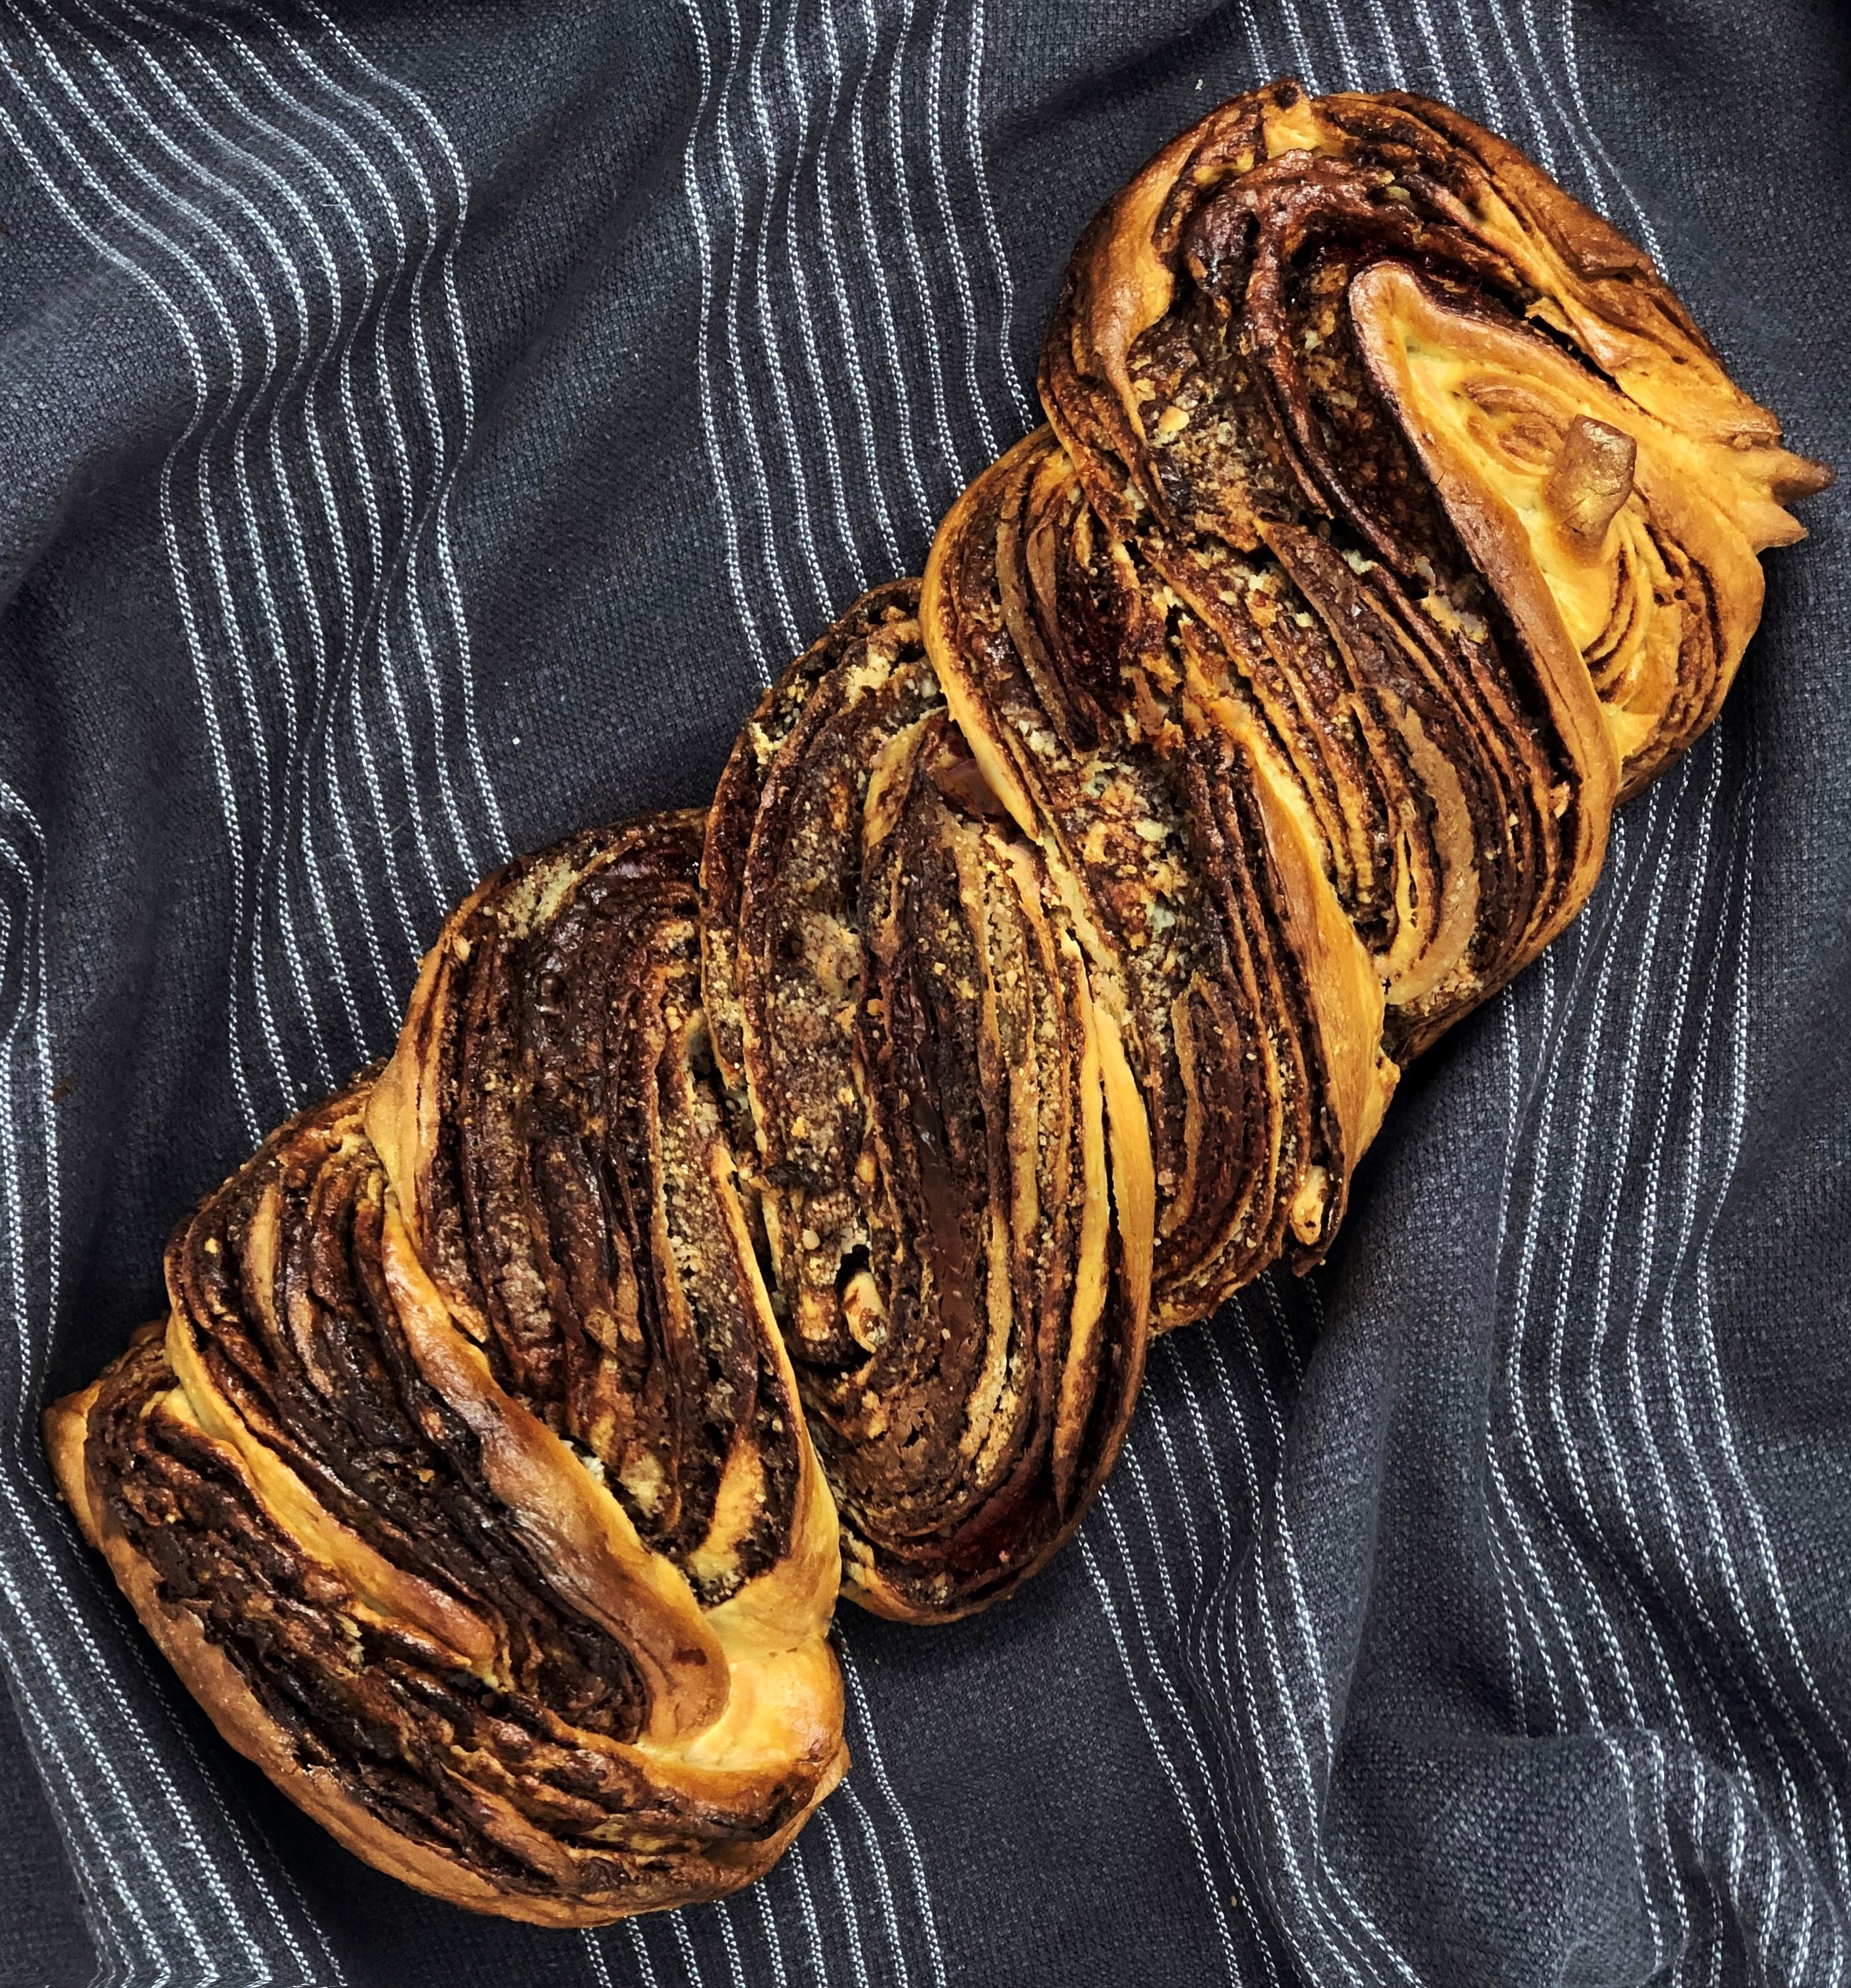
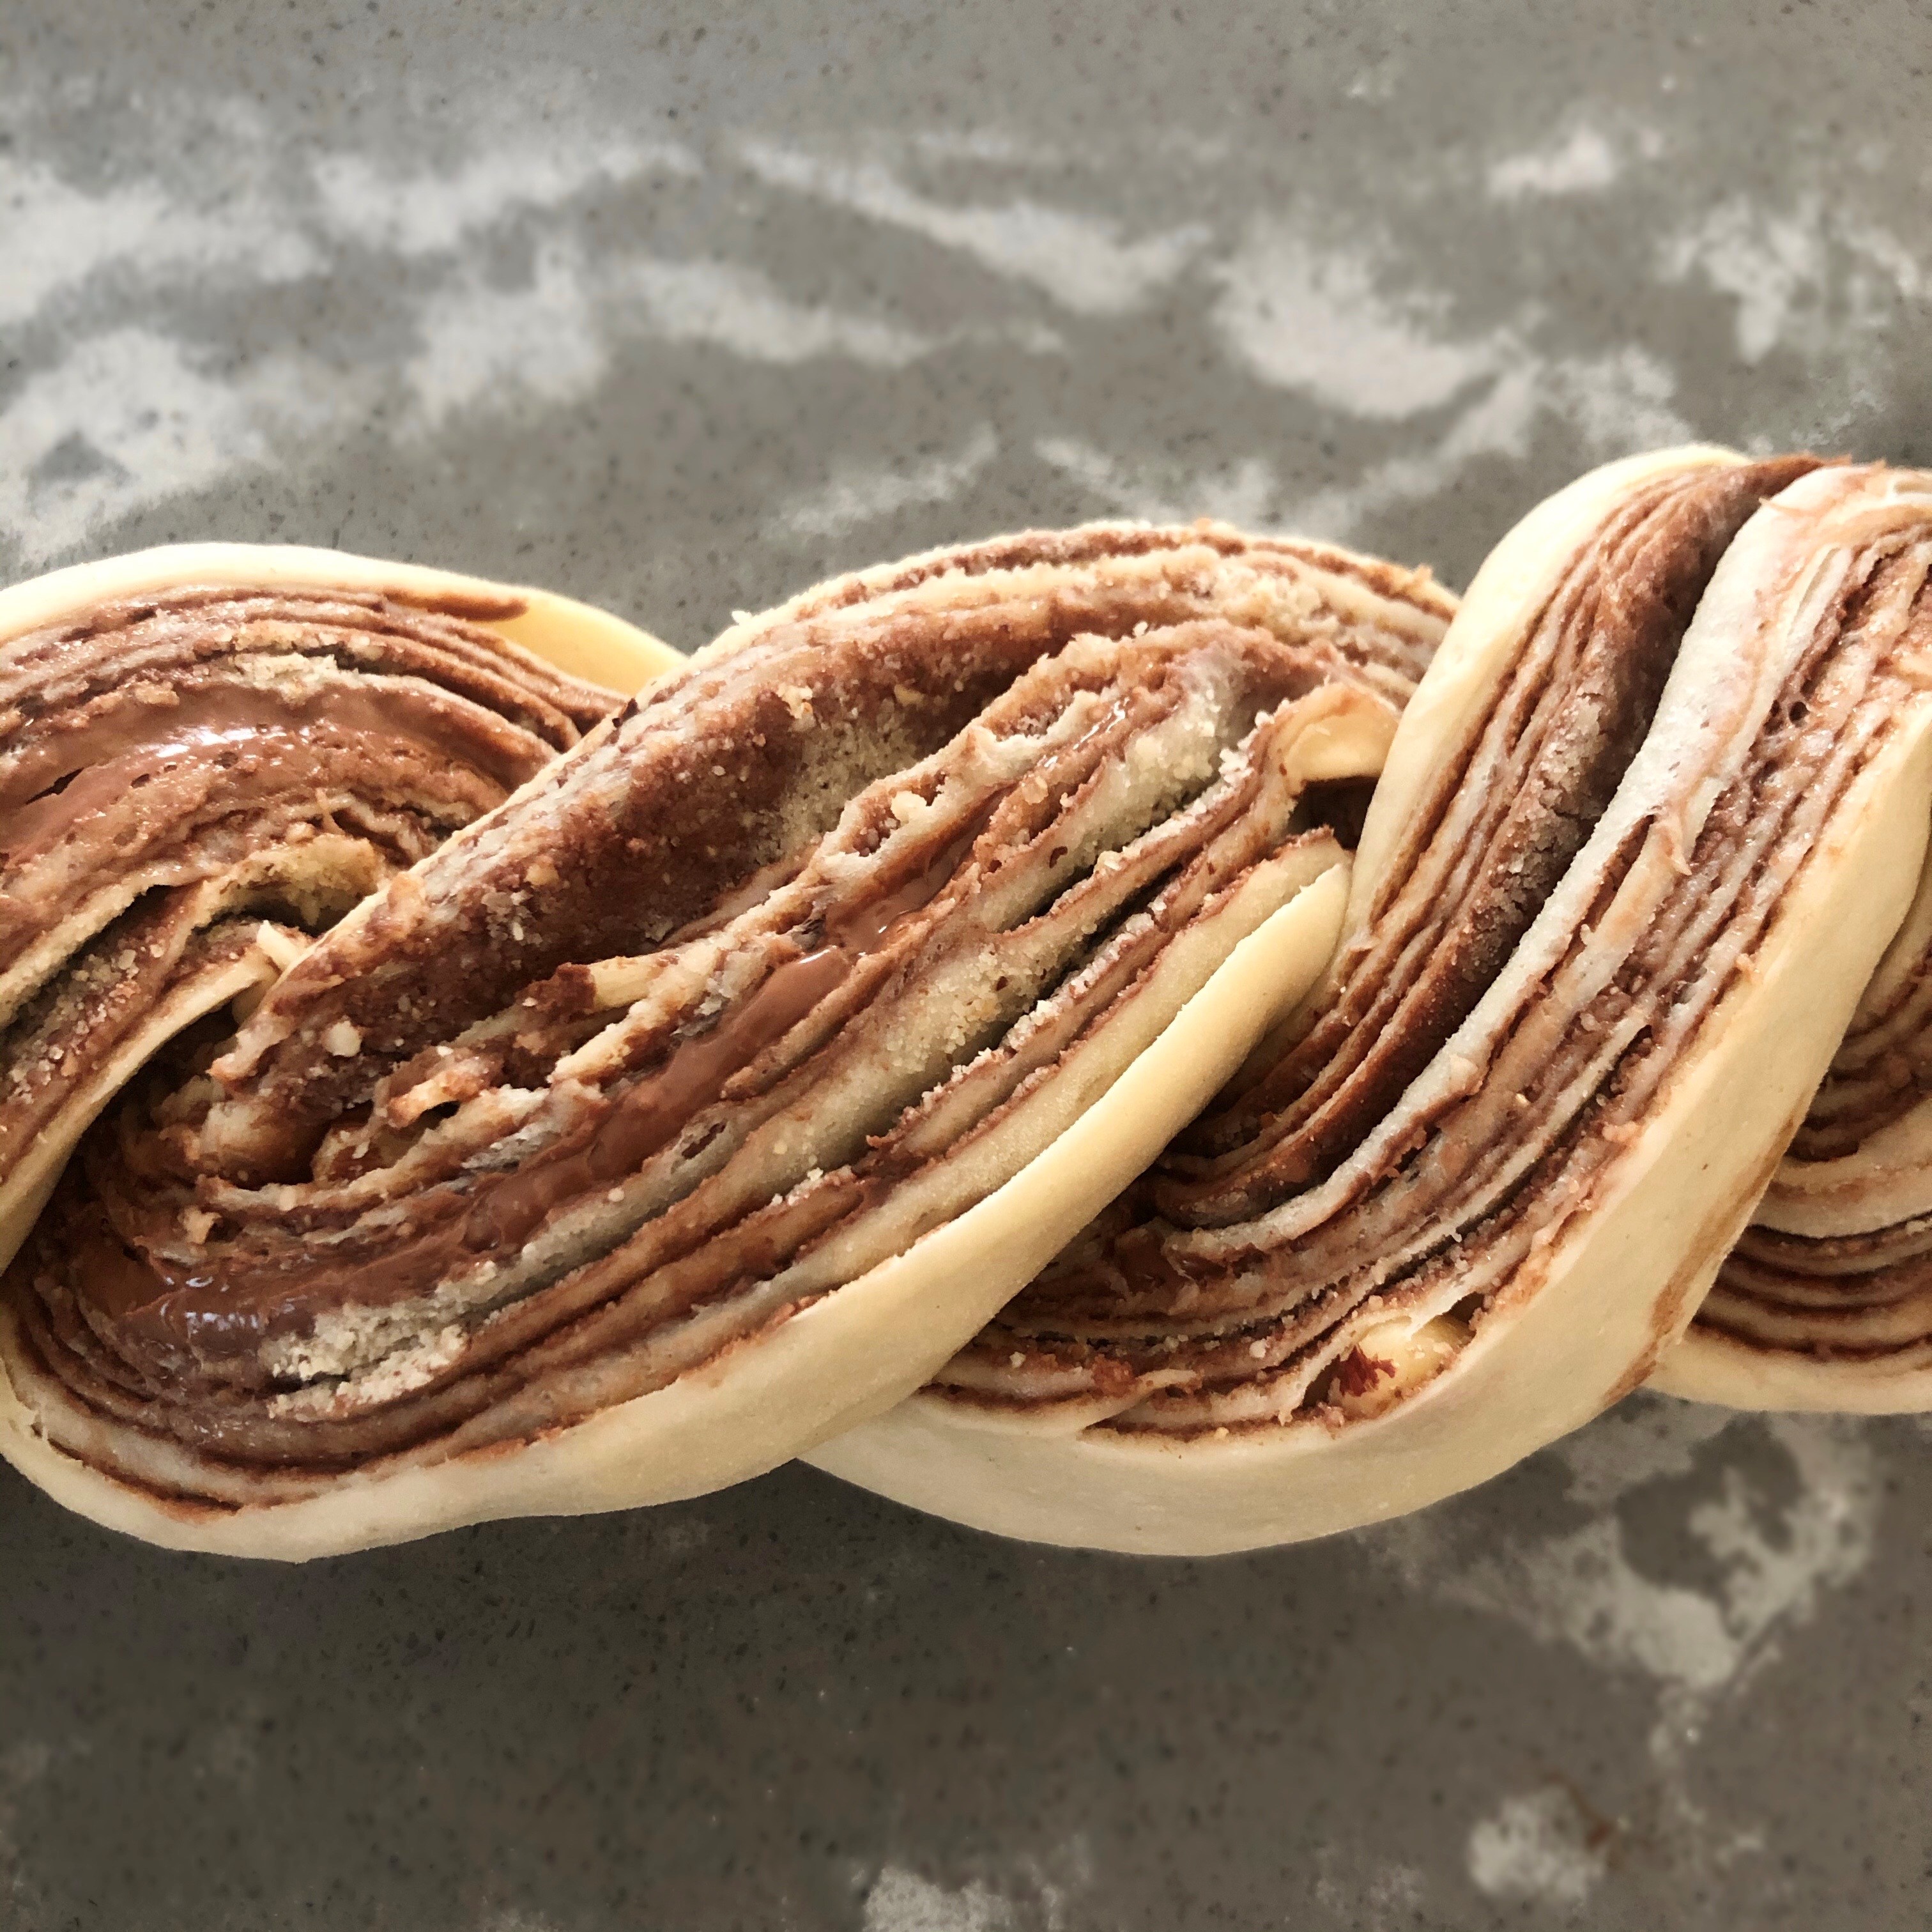
You then roll your dough: try to do it by rolling the short side over, so that you get more swirls into your babka. Once rolled, use a sharp knife to cut your roll down the middle to expose the chocolate and dough layers. You now have two long half rolls, which you cross at the middle before recrossing on both sides until you have a braid-like shape.

Transfer into a buttered loaf tin and, you guessed it, let it rest again. An hour to an hour and a half is perfect. Place into a warm oven and bake at 180°C for about 45 minutes. Test for done-ness (is that a word?) by poking with a skewer and checking if it comes out clean and dry. Or use a thermometer and see that the inside of your babka is at about 100°C.  Bring the loaf out and leave it to cool in its tin over a cooling rack.

Ok, if you want to go really out out you make a syrup during the bake by mixing equal parts of sugar and water, and you can pour it over the cooling babka (make some little holes in it with a little pick). It makes for a super soft and sweet bread, but I prefer it a little dryer so I usually just egg-wash the babka before baking… Like I said, I don’t have the sweetest tooth… Happiness is when you cut the babka into slices and discover all the swirls and folds you worked into your bread. I like it with strong coffee for breakfast… but also as an afternoon treat, anytime really. This is the perfect recipe for people who aren’t into the heavy butter in things like pain au chocolat (I really can’t take the crumbly buttery texture of croissanterie) but love the mix of bread and chocolate. Let me know if you try it…

With love, S.

Five starter smoothie recipes

Smoothies are my favourite on the go breakfast, it’s easy to pack them with nutrients and vitamins and you can take your smoothie cup pretty much anywhere in the morning. I have been using a Nutribullet for many years now, because I couldn’t get the right consistency from my traditional blender, which also didn’t like nuts much (that blender ended up at our local charity shop quite quickly after the arrival of the Nutribullet). Wonderful, but I still get a few messages on Insta and from my friends asking what does one do with these juice gizmos, and how to get the same tasty smoothies as the ones you get from juice bars? So I thought it would be worth a post.

Before we go on, just a little reminder: I am no chef, dietician or clean food guru (whatever clean food is), and I claim zero expertise in nutrition; I just love eating tasty, fresh, and mostly healthy food and most days of the week my breakfast consists of coffee and a smoothie of whatever I find between my fridge and my freezer. If you are a smoothie beginner, I would suggest starting with recipes that taste nice to ease you into it: there is no point starting a smoothie routine with something that tastes and looks like green pond water, as it will take all your motivation away. Most of my smoothies include at least one fruit to ensure a bit of sweetness, but on the other hand they always have one green leafy veg (usually spinach and kale when I can find baby kale leaves here) because that’s incredibly good for me.

To get you going, you will need to do a little bit of shopping: fresh and frozen fruit and veg (I love frozen bags because it means I can stock up, and sometimes I make my own frozen bags of anything, from bananas to raw spinach, and remember, organic is best…), a couple of good yoghurt pots (no good Greek yoghurt here in South Africa, sadly, but I did find a protein yoghurt by Danone that I like), a couple of unsweetened non-dairy milks, chia seeds and nuts, all of which can be found in most supermarkets these days. If you want, you can also visit your nearest health shop or order online some more esoteric ingredients such as spirulina powder, bee pollen, acai berry powder, cocoa nibs etc. and finally, I add protein powder to all my smoothies, at the suggestion of all the trainers I’ve worked with, but that’s not a must… Here are my five starter choices (PS – some taste like desserts, so are perfect as snacks as well)…

I picked my top five starter smoothies because they taste nice, they are great as a breakfast (these smoothies are full of nutrients, fats and carbs so don’t go thinking this is something to eat with your toast, the breakfast is in the glass…) and are a good intro to the whole smoothie fiesta. I hope you enjoy them!

With love, S.

Homemade marshmallows

We once threw Little Monsieur a vintage airplane party, complete with mini suitcases as favour boxes, gorgeous rosettes made of old map paper etc. And of course, ever the theme perfectionist, I was hell-bound in giving out cloud-shaped marshmallows as part of the favours… I could picture them in my head, soft, fluffy, light blue. But after a few days of browsing the internet with no other options in the shaped marshmallows department beyond the ubiquitous squares and (sigh) hearts, I almost gave up. Just before I did though, a little thought came into my mind and just wouldn’t budge: “Hmm, how about I make some myself?”

Thankfully, I quickly found out that, when it comes to marshmallows, that’s perfectly achievable (unlike making a perfect birthday cake complete with piping and frosting and decorations, something I have never and will never attempt, I know my limits). I shaped them as clouds that day using cookie cutters, but you can use this basic recipe for any shape you want. This is super easy, and is a lot of fun to do with bored children during a rainy afternoon or, say, day 39 of lockdown.

Make sure you got all your ingredients lined up as you start, you don’t want to be scrambling for the gelatine when your syrup is ready…

First, line a deep-ish baking tray with a mix of icing sugar and corn flour. If you don’t have icing sugar, take granulated sugar, pour it into your blender, and pulse until you get the right powdery texture. Soak your gelatine in cold water for at least five minutes. Whilst it’s soaking, make a syrup using only the caster sugar, water and glucose (you can use golden syrup if you don’t have glucose), and only add the gelatine once your syrup is thick and sticky (the original recipe says to check your sugar thermometre, who has time for sugar thermometres?! I test by running my spatula on the bottom of the pan, if it leaves a trace it’s good to go). Word of caution number one: when you pour the gelatine into the syrup is basicallt the moment when everything might go horribly wrong, as the mixture bubbles up and can risk burning your hand if you aren’t careful! You need to stir to stabilise the now quite thick syrup down. After you stabilise the syrup, pour it into a metal jug and let it cool down quite a bit.

Next step, meringue. For this, make sure your egg whites are super cold (so keep them in the fridge whilst you’re making the syrup) and add a pinch of salt, for good luck… Make sure you whip them until stiff, and for that I can only recommend an electric whip, unless you’re trying to break your own arm off. Carry on whisking as you pour the syrup in slowly: you’ll see the mixture turn super shiny and white… If you fancy a bit of flavouring add a couple of drops of vanilla extract here, also this is the right time for a little food colouring. Ok almost done. Now all you have to do is whisk for a further 10-15 minutes, until you get a thick mixture which holds on to the whisk; and this is where I’ll give you the second warning: the mix does stick to the whisk, and in fact it might even want to climb up it making a grand old mess, but trust me if you stop whisking too soon your marshmallows won’t firm up and you’ll have to start again from scratch… (I should know!)

Once you’re happy with your mix, pour into the tray (which has a generous coating of icing sugar and corn flour, remember?), and leave for a bit. Once the mix is completely cool, dust with more icing sugar and corn flour mix, then leave to rest and firm up for a couple of hours at least. Check the texture by tapping lightly with your finger. If it doesn’t stick to your finger, it’s time to shape. You can use any cookie cutter you want if you fancy shapes, just make sure you dip your cutter in the icing sugar and corn flour mix first; for standard marshmallows, use scissors dipped in the icing mix and cut bands then squares. Store in an air-tight container for a couple of weeks maximum with a bit more of the icing mix. If you leave them in a bowl the outside will harden over a day, but I can tell you these are so delicious it’s unlikely they survive too long in a house with sugar lovers…

These homemade marshmallows are super fluffy and don’t have the sticky gummy texture of the shop bought ones, also you’re saving your kids a few additives in the process so give yourself a pat in the back.

With love, S.

Fig frangipane tartlets

Afternoon tea is a great tradition, when else can you sit around a table with your favourite people (ideally) and indulge in pastries, mini sandwiches and other treats, washed down with your preferred tea blend or, even better, a cup of tea and a few glasses of champagne?! I also adore scones but to date I’ve not managed to make a recipe that I really love as much as the ones I eat in restaurants… Of course one of the added bonuses of tea is you get to bake a treat beforehand, something I find highly therapeutic. I made these frangipane tartlets topped with fig recently, and they came out so delicious I am sharing this here for some of you to try out.

Frangipane is an almond cream, with a little hint of vanilla, that is used as a filling in tarts, and cakes such as the Galette des Rois, Bakewell tart, etc. I love it with pears, figs, and even berries on top. It is a very simple recipe with almond flour, sugar, butter, and eggs (see below for full list of ingredients for the tartlets)… yes , this is a dessert, so evidently it’s rich and sweet, what did you expect? Keto-friendly frangipane? Trust me though, the tartlet in itself is light and fluffy and totally worth the extra calories…

I use a shortcrust pastry as a base, and line the small tartlet molds with it before putting them in a pre-heated oven at 180°C to blind bake until they are just short of light gold. The perfect size for this is a 10-12cm diameter mold, anything bigger will be too much for a tea or even as a dessert, given the sweetness of these tartlets.

The recipe for the frangipane is super simple and you just need a whisk, electrical or otherwise. First you mix the sugar and butter together and cream the butter until smooth, before adding the almond flour to a sandy dough consistency. Scrape the inside of the vanilla pod with a sharp knife and add to the mix (alternatively use 1.5 tsp of vanilla extract), and add the eggs, continuously beating the mixture until everything is combined. Finally mix the flour in, and you should have a thick batter, something that can be piped or spooned into the pastry cases.

I put about two tablespoons of frangipane per tartlet (it does raise in the oven), then top up with thin slices of fig (the tartness and texture of the fig slices works well with the smooth almond filling), and back into the oven at 180°C for about 20 to 30 minutes. If you’re making a big tart count at least 45 minutes for baking.

You can dust some confectionery sugar on top, but I like the look of them raw. They look like little flowers, don’t you think? Let me know if you try them how they come out.

With love, S.

Two overnight breakfasts for busy bees

Everyone has a favourite meal… some love dinner, some are obsessed with the 11AM chocolate break, for me it’s breakfast. I can give up all the other meals, breakfast is my thing. I love sitting down and indulging in a leisurely meal at the dining table, overseeing the garden, reading news or scrolling through my Insta feed, but most days that is not an option.

I have smoothies most weekdays, as it’s super convenient to take my Nutribullet everywhere (when I lived in London it would often come with me on the Eurostar when I had to go to Paris for the day), but sometimes I like something with a little more substance, and I found some pretty cool options that I think some of you similarly busy bees might like as well. Here are two that you can prepare overnight, and just grab and go on your way out.

The perfect chia seed parfait

Chia seeds pack 40% fiber and 14% protein, not to mention magnesium, manganese, anti-oxidants, more omega 3 than salmon, more calcium than most dairy (I checked, and found no croissant with this type of nutrient list). Ok, that’s it for the educational minute of the day… Now, how do they actually taste? 

Actually, they don’t taste of anything much, like most whole grains, so they make a perfect breakfast base. Yes, the texture is a bit gelatinous once soaked, a little like thick caviar, and it’s not for everyone… Putting together is child’s play, then all you have to do is add your favourite toppings: fruits, nuts, granola, cacao nibs, cinammon… My best option so far? Topped with a spirulina fruit blend, some blueberries and pecan nuts. You can make a bigger batch of the base and keep it in the fridge for 2-3 days or to share with your family: Little Madame used to love this when she was a baby, although recently she’s more a porridge girl…

Overnight protein oats (a.k.a. muesli with a kick)

I have friends who skip breakfast and jump on the venti version of whatever their favourite barista mix is, usually a fat and sugar laden drink with very little caffeine in it, and yet would scream at the idea of ingesting any types of oats, on account of all the carbs. As you know I’m the black coffee type, but I adore oats, even though (or maybe because) they are carbs. By the way we all need a little bit of carbs in life, especially if we lead an active lifestyle or simply if we like wine (yes, carbs again), even rabbits, who eat theirs in the form of carrots and beets… Plus, oats are filled with complex fibres that help us keep a healthy heart, and given the number of jerks around, everyone needs a healthy, strong heart, right?

But, let me tell you, the reason I love overnight oats: they are the perfect busy bee breakfast, you can prepare them the night before, put it all in a jar and take it with you in the morning, and they are absolutely delicious; I usually add crushed nuts, some cinnamon, and either fruit or cacao powder if I’m feeling extra indulgent. I prefer mine made with real Greek yoghurt, the Fage type, alas in almost three years of living in Johannesburg I’ve not been able to find any, so instead I use regular yoghurt, but it’s not the same… Please, if you know where I can find proper Greek yoghurt in Jo’burg, can you let me know?

Do you have any infallible breakfast recipes that are good for you and still yummy? Please don’t try to convince me that a 90% kale smoothie with a bit of pineapple for sweetness is delicious, I know that to be a lie… but if you do have a favourite smoothie or omelette, do share!

With love, S.